


This guide will help you to make wonderful personalised greeting cards, invitations and flyers. Also, how separate apps on your Mac can be used together to create something new and unique.
Making Greeting cards using the Photos App and Mimeo Photos:
Step 1: Finding and selecting the photo(s) you want to use in your card.
Open the “Photos” app on your Mac. If you are running Mac OS 10.11 El Capitan or earlier you may have iPhoto instead.
To find the photos you wish to use, try using the search tool built into photos. It can be used to find photos of almost anything; a specific person, or people, location, objects like “lake” or even an event — for example, a concert or wedding.
Once you have found your photo(s) or album, you can select and deselect multiple photos by holding down the “command” key as you click on them or holding down the shift key will select a whole block of photos.
Step 2: Choosing your Card design.
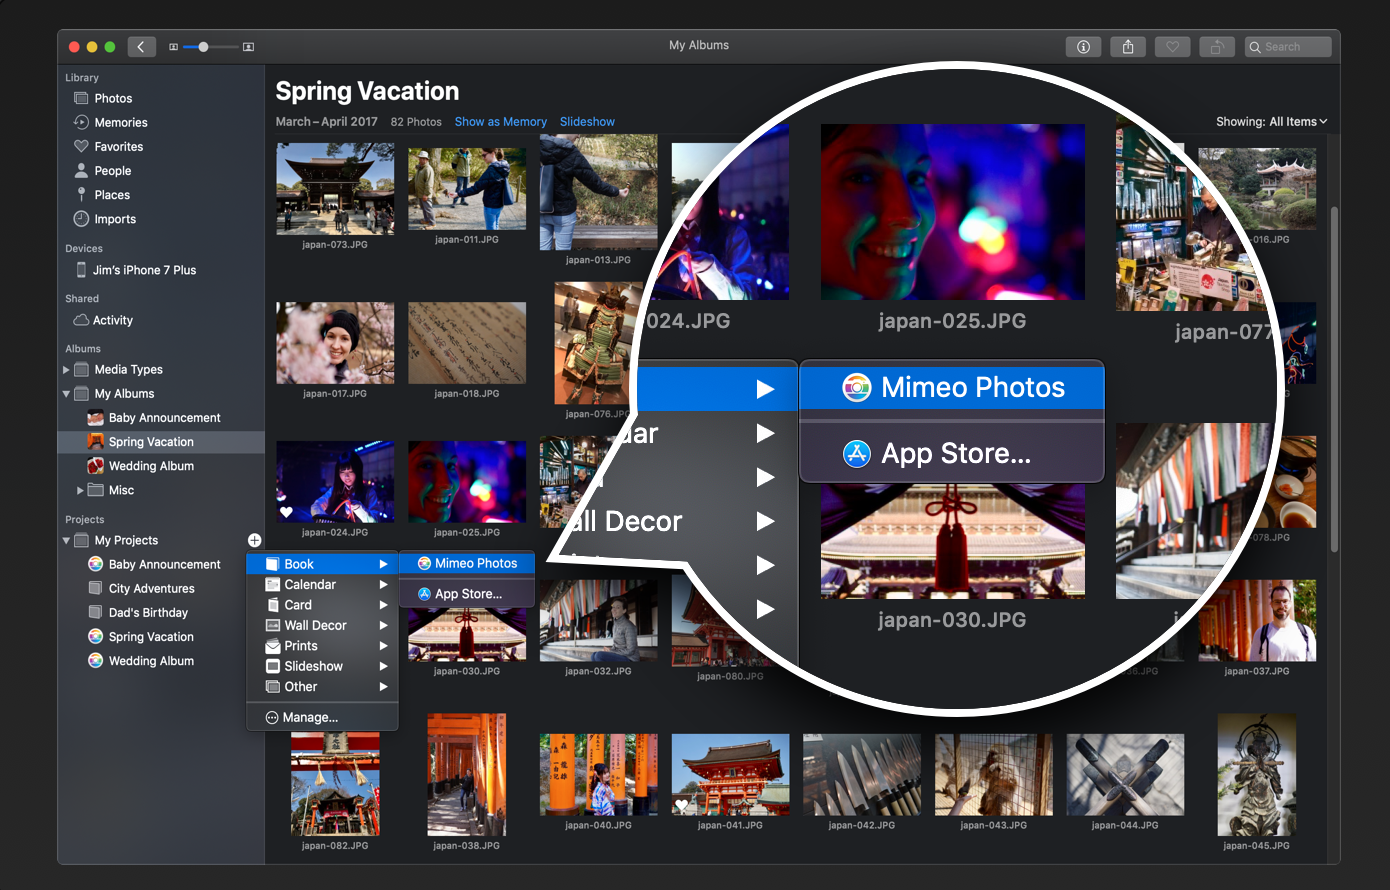
After the photo(s) you want to use are highlighted then select “File” > “Create” > “Card” from the menu at the top.
Here you will need to install an extension app if you have not done so already.
Select “App Store” and it will present you with a few options to choose from, I like “Mimeo Photos” as they have a wide range of products, but other services are available.
Once “Mimeo” or your preferred app is on your mac and it is open, select the card you would like to make.
Now select a theme, this will determine the layout, fonts and colour palette of the card. Try to pick one with the same number of photos you intend to use. If you are not sure scroll to the bottom and select blank.
Step 3: Familiarise yourself with the program.

Note: if you are using another extension other than “Mimeo Photos V3.1.1” the following may be different for you. It’s still worth taking a moment now to get a sense of how to use the app just so you know where everything is and what it does.
At the bottom of the screen, you can navigate between the different pages on the card.
On the right side, you can add or change photos, text, layout, background.
On the top you can access buttons that (from left to right) undo/redo, cut/copy/paste, theme/product, info/support, preview/edit, save and buy.
NOTE: Changing the “Theme” or “Product” can undo your work. I recommend duplicating the project first before using this feature. You can duplicate a project by right clicking it on the side bar and selecting duplicate.
You can add more photos to the project by selecting them and dragging them to the project on the sidebar.
Step 4: Making the card.

Start by choosing a background colour, then the layout. Once you have a layout, you can add images by dragging and dropping them onto the card.
After adding images you can select them giving you the following capabilities:
Use the hand tool and zoom slider to position them in the frame.
Use the transform tool to move and resize the image on the page.
The edit tool to bring up the photo editor.
You can also quickly rotate and move the image to the front or back.
The “Background” button will make the image the background image.
And you can use the “Trash Can” to remove the image from the card without deleting it from your photos library.
Once you have your images in place, you can add text using the button on the right side.
To edit the text type in the white box what you would like it to say.
You can move and resize the text box with the “Transform” tool.
Clicking on the “A” symbol will give you more options for fonts, sizes, colour and layout.
If you find the text hard to read try giving it a coloured outline.
When you are happy with the card Tap the “preview” button, this will give you a mock-up of what the card will look like when you buy it.
If you would like more tips on how to use mimeo photos or the photos app check out their help pages:
• Mimeo Photos Help: https://intercom.help/mimeo-photos
• Photos App Help: https://support.apple.com/en-au/guide/photos/welcome/4.0/mac/10.14.4
Turn your greetings cards into invitations using preview:

Follow the steps above to design your invitation. (Or make an invitation in any program like pages, see more in the flyers section)
Take a screenshot using the keys “cmd + shift + 4” this will give you cross hairs to draw a box around the card.
It will save an image of the card to your desktop, here you can open it in preview by right-clicking on the image and selecting “open with preview”.
You can open most documents, PDFs, and images in preview and it has simple yet versatile editing tools built right into it.
Click on the “show markup toolbar” (the marker in a circle) to get started.
There are “wand” tools to select all of one colour.
Pen tools for drawing and highlighting.
Shape and magnify tools.
The ability to add text boxes, signatures, and sticky notes.
The ability to adjust colour and the size of the image.
And tools to alter the style, colour and font of your text-boxes and shapes.
Most of these tools are not super useful for making invitations but know that they are at your disposal if you ever need to quickly mark up an image or document.
Once the invitation is satisfactory, you will want to print multiple copies of the same image and not necessarily in A4 size.
Open the “print” menu by using command+P or by selecting file>print from the top menu.
Use the “copies per page” drop-down menu to print multiples of the same image on one sheet of paper, then choose how many pages you would like to print. For example, if I need 8 invitations I could 4 copies per page and print 2 pages, saving both time and money
Let’s say this is a wedding invitation, and you wanted them to be printed professionally on individual pieces of cardboard but you don’t want to go through the hassle of doing that yourself. You could save this image and reopen it in the photos app, where you can open it with Mimeo Photos or another extension and have them print and mail out your wedding invitations for you.
If you would like more tips on how to use the preview app or markup check out their help pages:
Preview App Help: https://support.apple.com/en-au/guide/preview/welcome/10.1/mac/10.14.4
If you are in the market for Flyers or Brochures, you can quickly make a design in pages.

Step 1: Open a new pages document and check out the flyers and posters templates. (we can find Brochures under “miscellaneous”)
For this example, I will use the “tab flyer” template.
Step 2: Edit the text and images to suit your needs.
Click on a block of text to edit it. Use the format inspector on the right-hand side to change the style, font, colour, alignment and more.
To change the photo, you can drag and drop one from your computer or use the “media button” to select an image from the photos app.
The pull tabs on the bottom are just text boxes on a 90-degree angle, you can edit these individually or copy and paste them.
but you can do this quickly by using a table instead:
Edit one text box to resemble what you want, then move that box to one side.
Click and drag a box over the remaining text boxes and dividers to select them all, then press the delete key to remove them from the document.
Now insert a table and delete all but the first row, if you like add extra columns up to 8.
Move the table to the bottom of the page and resize it to take advantage of the space.
Copy your saved text box and paste it into the first column, you can now drag the yellow “auto-fill cells” circle to fill the remaining columns with the same text.
Once your flyer is finished you can print it by using command+P or by selecting file>print from the top menu.
Tip: Try using the PDF drop-down menu in the print window to “open in preview” to use tools I mentioned before or to print a few “mini” flyers on one page.
If you would like more tips on how to use the Pages app check out their help pages:

I hope this little guide has helped you realise how Photos, Preview and Pages can all be used to create personalised cards, invitations, flyers and brochures. Moreover, when they are used together what can be achieved by playing and experimenting with what tools each piece of software offers you. I look forward to seeing what unexpected things you create with the information you have gained today. An if you have some time I would greatly appreciate it if you could give Macs-4-U a review on any of these sites as it helps more people discover us:
Facebook: www.facebook.com/macs4usales
Google: www.google.com.au/search?q=macs-4-u
Yelp: www.yelp.com.au/biz/macs-4-u-midland
ProductReview: www.productreview.com.au/listings/macs-4-u